CRM for Modern Mortgage Brokers
Do not waste any time chasing down client information. Our System will send your clients information requests, allowing them to fill out and upload their data and documents to a secure link, leaving the fact-finding to the client, not you. SwiftCase's Mortgage System cuts out unnecessary meetings and speeds up traditionally long and inefficient ways of collecting data.
Our System will remember your Clients' details. If you create a new enquiry for an existing client, SwiftCase will pre-populate all the information fields with the client's details, saving you and your employees time, and increasing efficiency.
Have a look through the Mortgage Enquiry Workflow below to discover how our innovative automation technology could work for you.
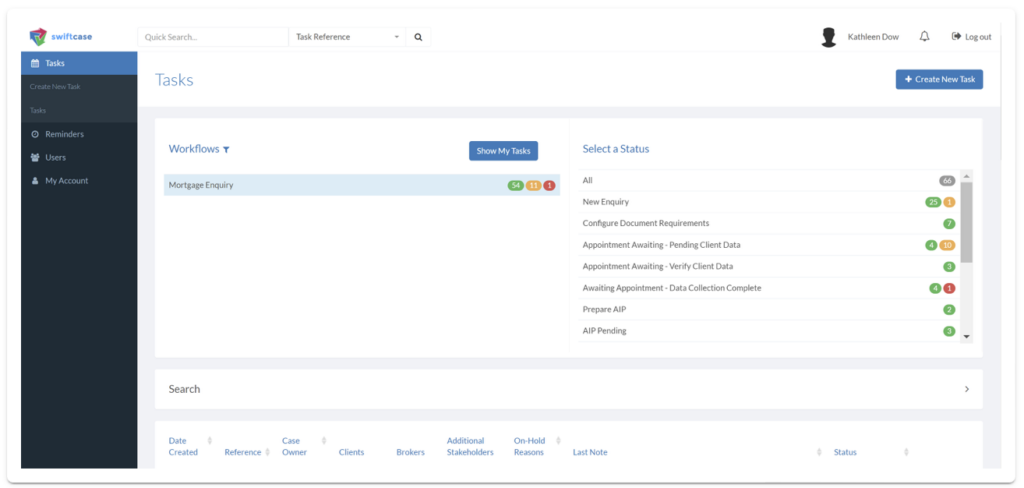
- Click the Create New Task button on the top left-hand side of the dashboard.
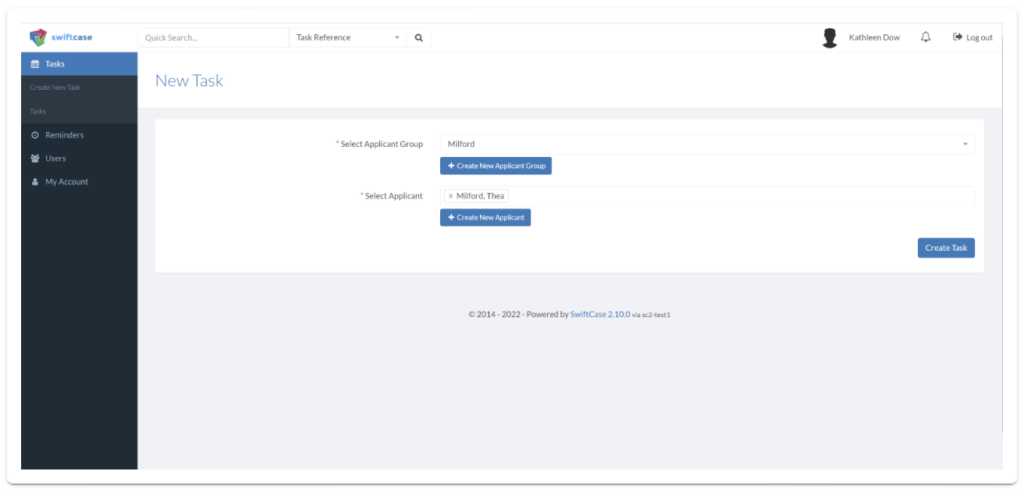
- This will take you to a New Task page. Select an Applicant Group from the dropdown box or click the 'Create New Applicant' button underneath. The Applicant Group could be the family name of a married couple, the Company name of a business applying for a mortgage, or any group of individuals. Select 'Applicants' from the dropdown box or click the Create New Applicants button underneath. Applicants are the individuals applying for the mortgage. At this point you will only need to collect the contact details (email/contact number)of the main applicant, as they will fill in the bulk of the fact-find themselves, and add any additional applicant information on the task. Once these fields are filled out, click the Create Task button.
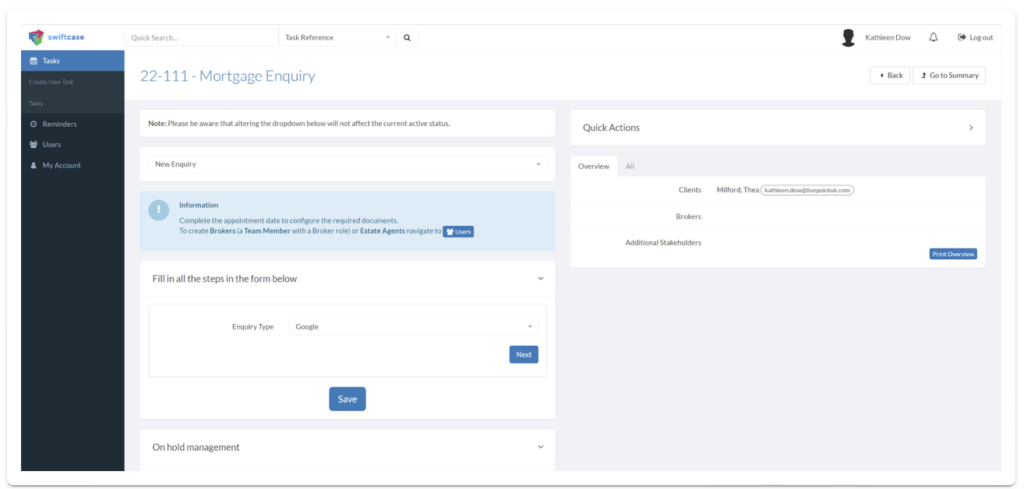
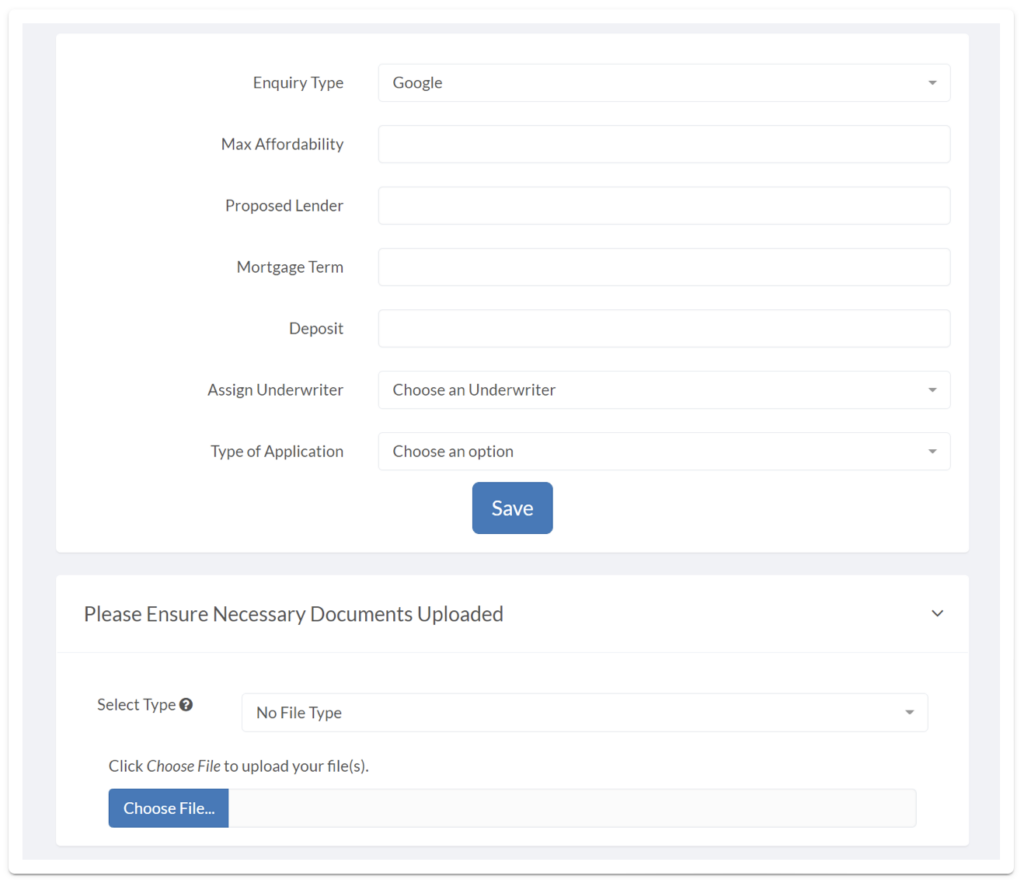
- This will take you to a New Task page for that applicant. Select from the Enquiry Type dropdown box, the route in which the Applicants found your company. If this was an Estate Agent Enquiry, add the Estate Agents they came from in the Assign Estate Agent dropdown box. Click Next to choose a broker to handle the enquiry, and also input an appointment time agreed with the applicant. Once these fields are filled out, click the Save button. This will finalise the creation of the enquiry task and update the status of the task to Configure Document Requirements.
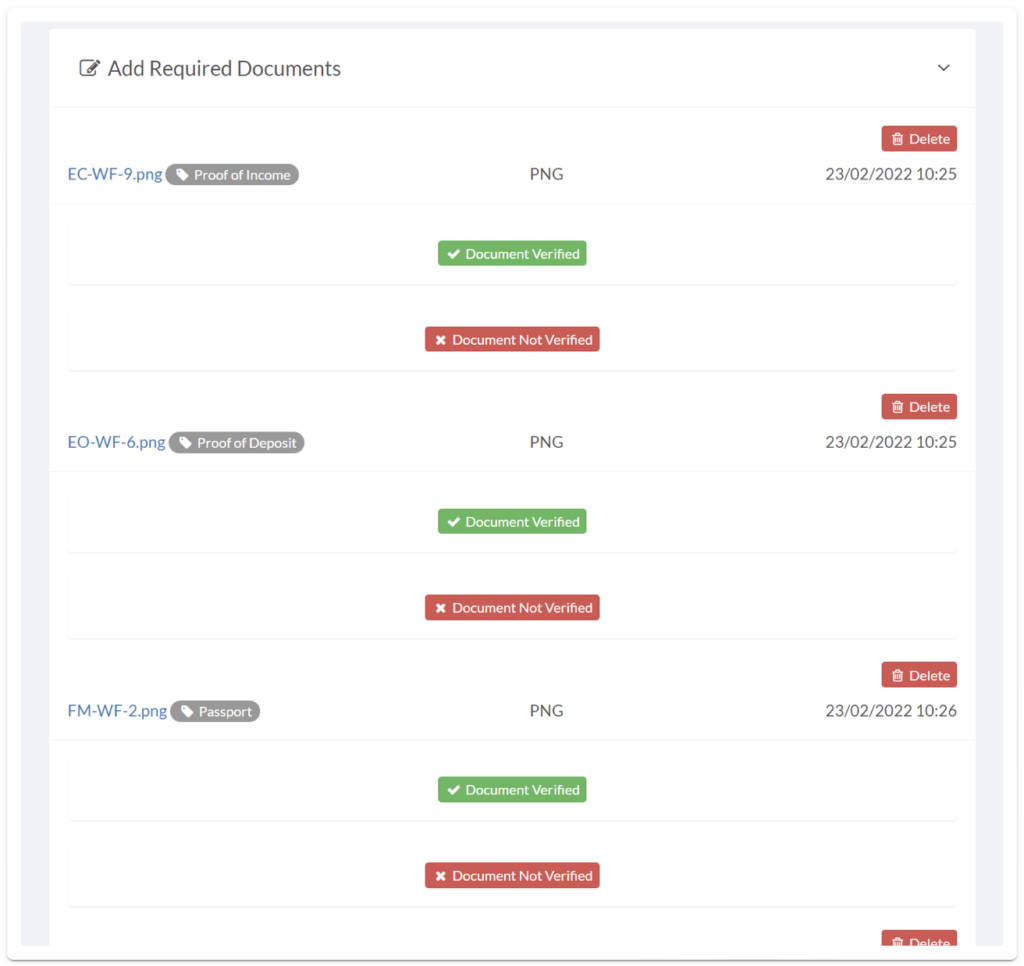
- Click the Add Required Documents button to outline all the documents you need from your Applicant(s). You can add multiple Required Documents, by re-clicking the Add Required Documentsbutton. Choose the document type from the Select Type dropdown so that the applicant will be informed later in the workflow.
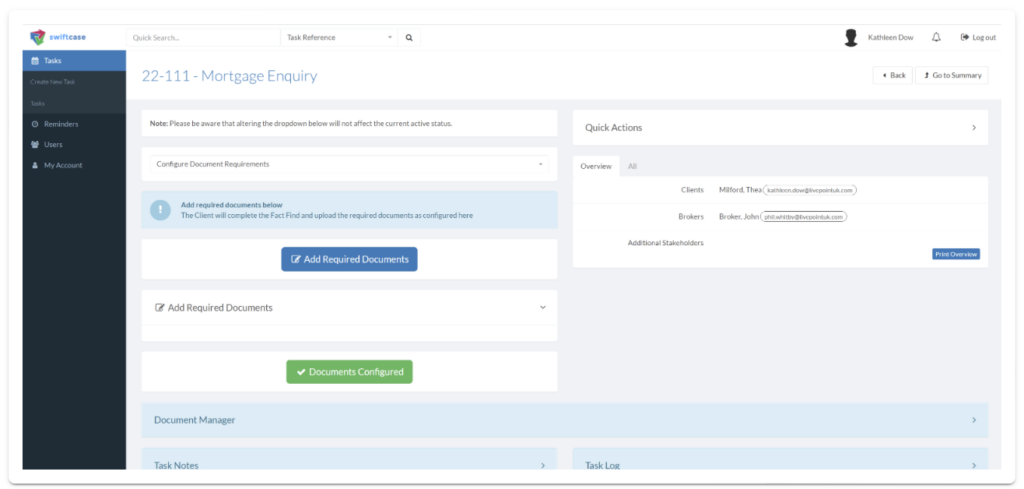
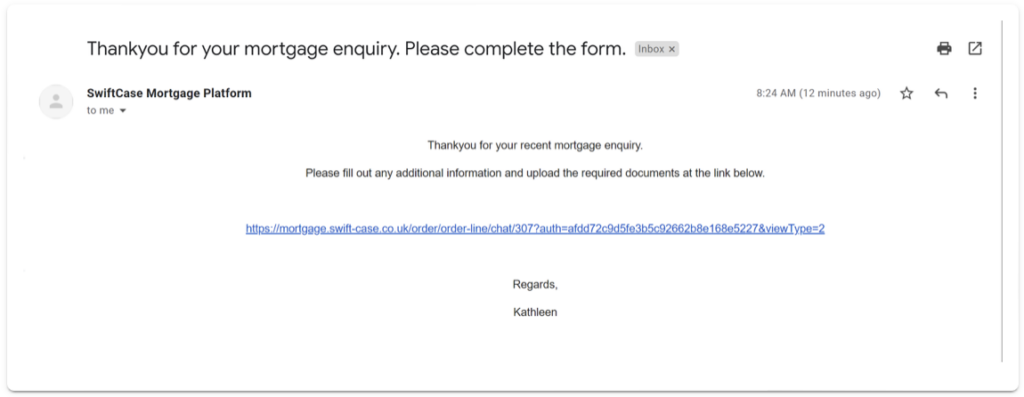
- Once all the required documents have been added, click the Documents Configured button. This will move the Task status along to **Appointment Awaiting- Pending Client Data'**and will automatically send out an email to the Applicant(s) providing them with a link, where they can fill out any additional information and upload the required documents. This drastically reduces time wasted going through documents and information face-to-face, benefiting both your business and your customers. Once the Applicant(s) have submitted any information and documents, the link will be inaccessible to anyone, increasing security and peace of mind

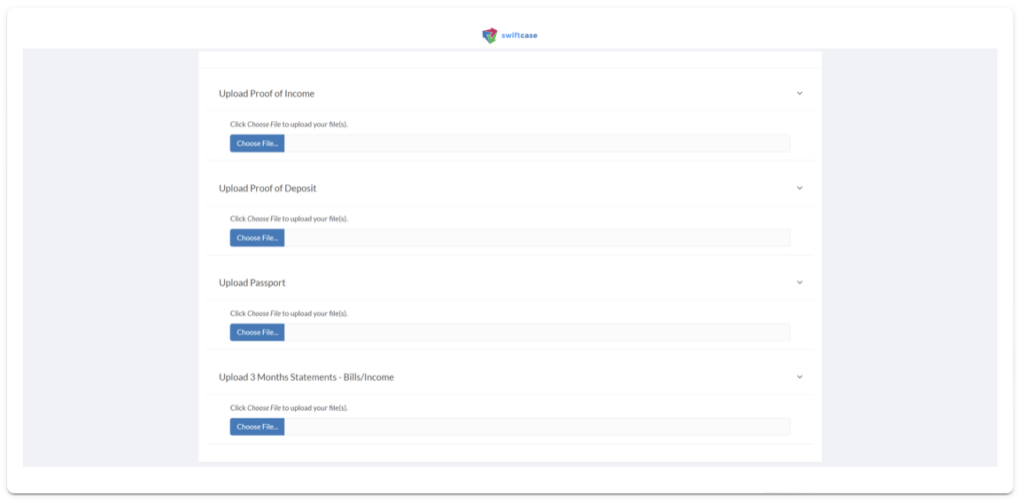
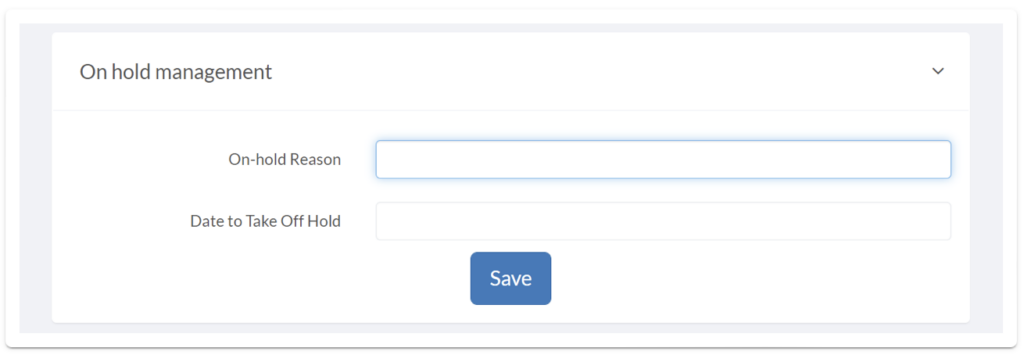
The information and documents submitted by the Applicant(s) via the link, will automatically populate the Required Fields and Required Documents on the Appointment Awaiting- Pending Client Data status page, and then move the Task status on to Appointment Awaiting- Verify Client Data. You can also put the Application on hold by entering a reason in the On-hold Reason dropdown box and a date in the Date to Take off Hold box- this will update the Task status to On Hold.
To Verify the client data is correct, and they have uploaded the correct documents click the Document Verified or the Document Not Verified buttons under each document. If you decline a document, an email will be sent to the Applicant(s) requesting additional data. Once all the documents have been verified, the Task Status will move to Awaiting Appointment- Data Collection Complete'
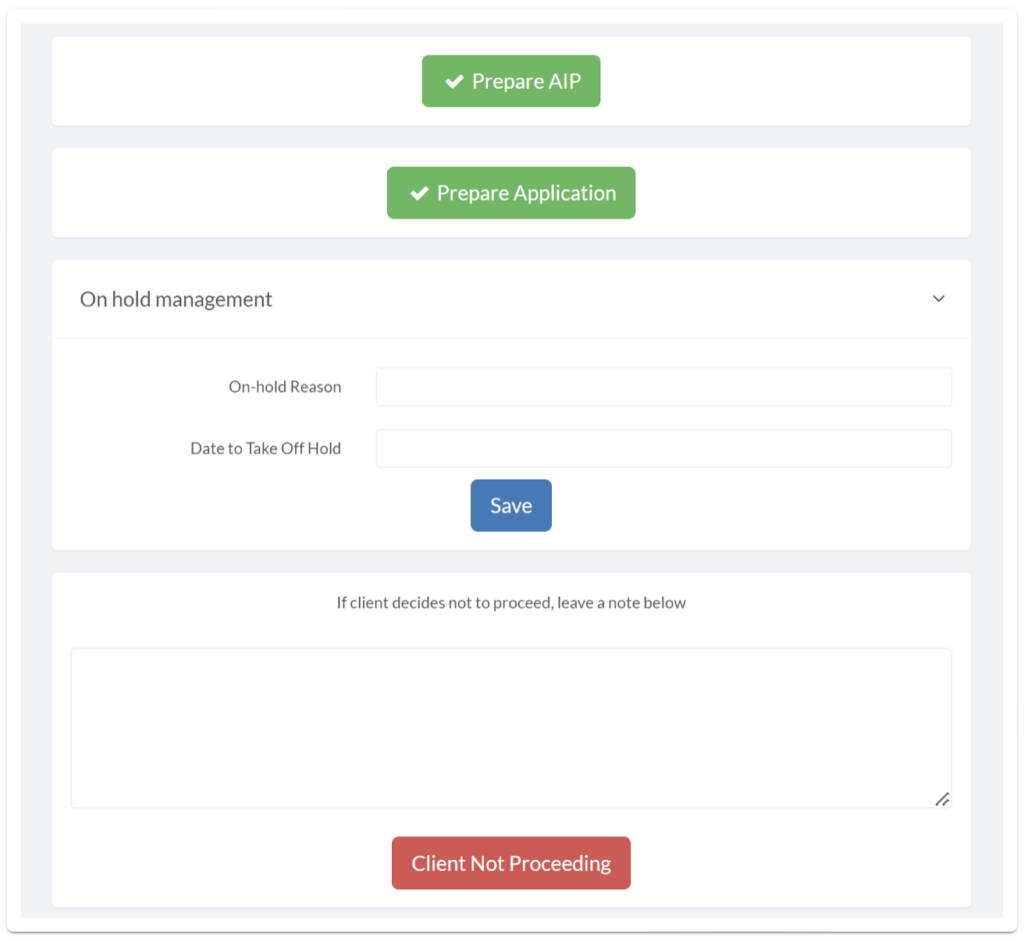
To rearrange the Appointment, you can do so by clicking the Re-arrange Appointment button. This will take you back to the New Enquiry status so you can put in a new appointment date. Once you have had the Appointment and collected additional information relating to loans, buy-to-let arrangements, and current property details during the appointment. From here you can click Prepare AIP, Prepare Application, Client Not Proceeding buttons, or fill out the On hold Management form.
AIP
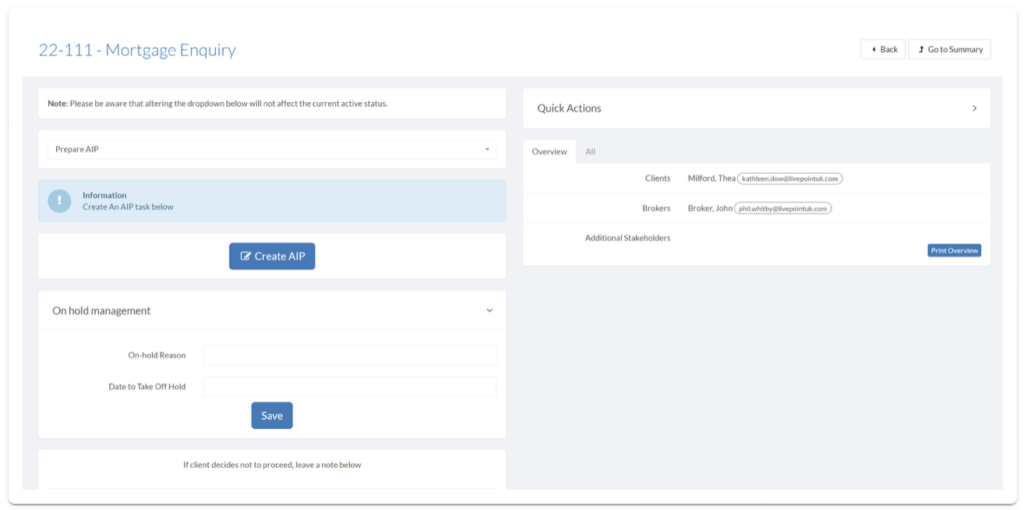
Click Prepare AIP. This will change the task status to AIP Pending. Open the AIP Child Task in the AIPs in Progress panel on the Task page.
Fill in the relevant fields and upload any necessary documents on the Task page and click the Details Submitted button. This will update the child task status to Awaiting AIP.
If the AIP is successful, you can upload the AIP and click the AIP Successful button, this will update the child task status to AIP Successful. If the AIP is unsuccessful, outline the reason in the box provided and click the AIP Unsuccessful button, this will update the child task status to AIP Unsuccessful.
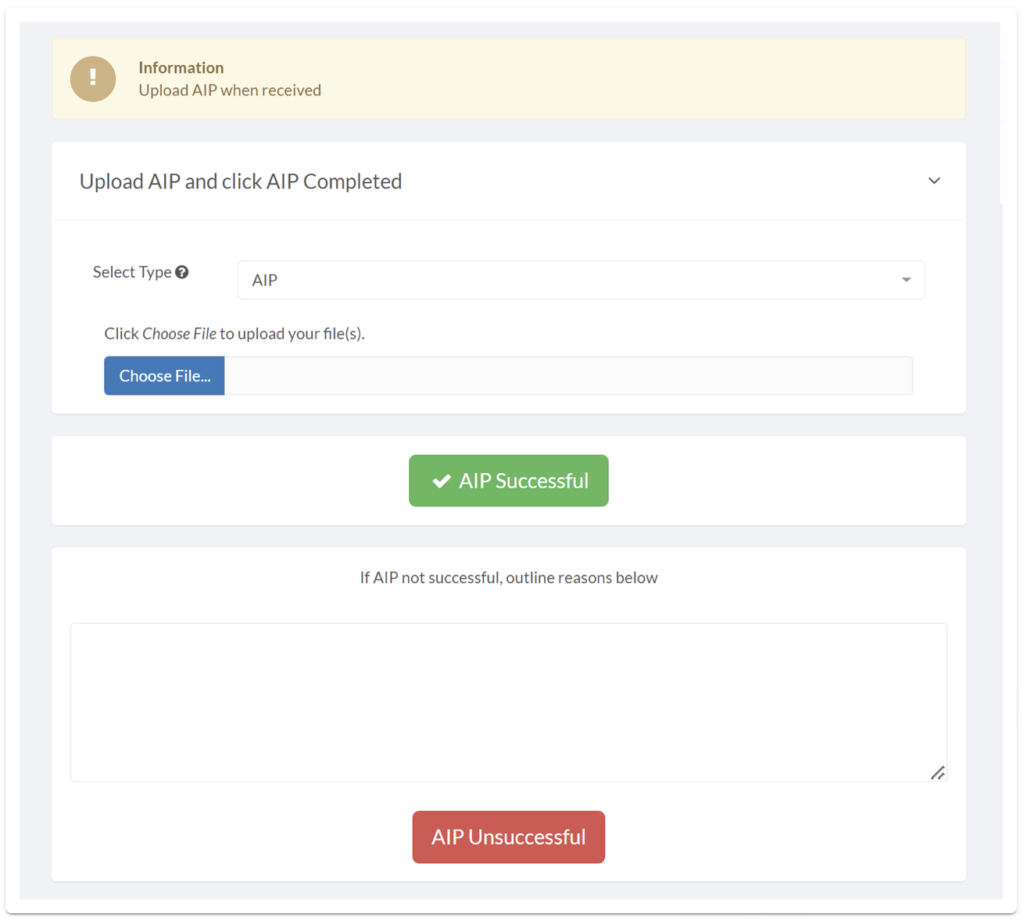
You can create more than one AIP child task at one time. If any of the AIP Child tasks are successful the parent Mortgage Enquiry task will change status to Prepare Mortgage Application.
Prepare Application
Click Prepare Application. This will change the child task status to Mortgage Application Pending. Open the Mortgage Application Child Task by clicking the Prepare Mortgage Application button.
Fill in the relevant fields and upload any necessary documents on the Task page and click the Pre Application Review button. This will move the child task status onto Pre-application Review.
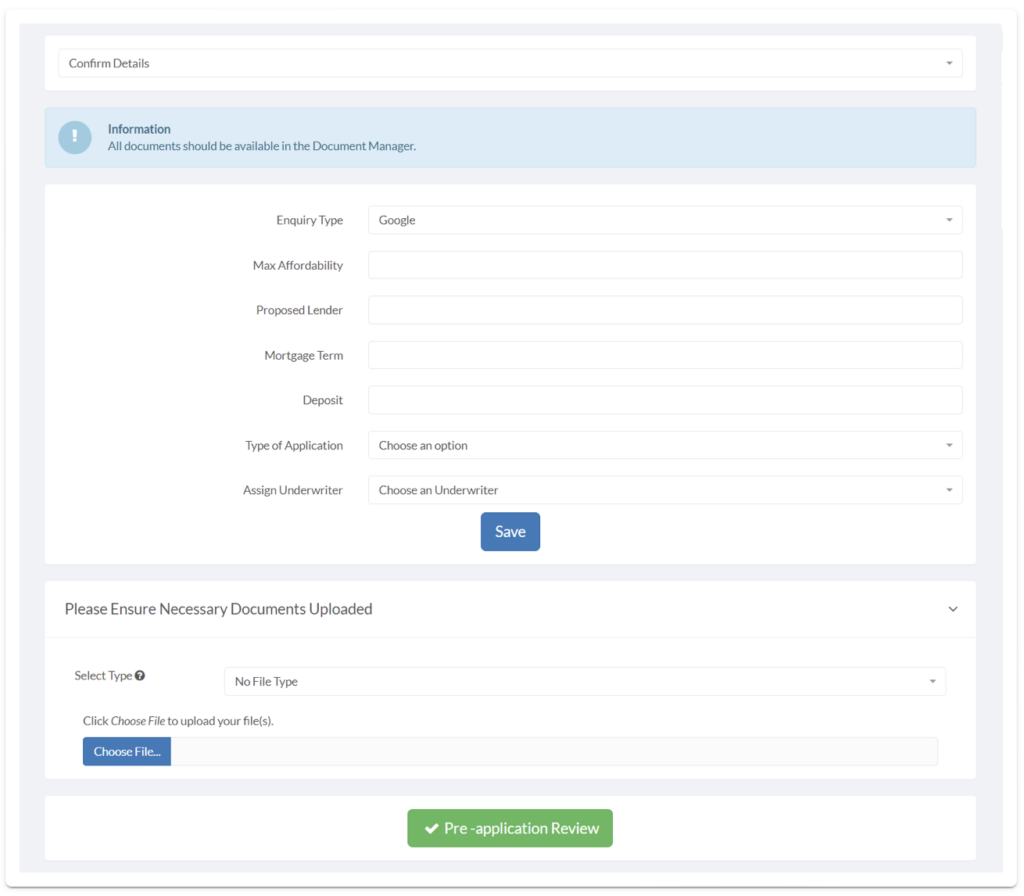
Fill out all the fields in the first panel on the Task page. Below this panel will be the Applicant(s) information, that will be automatically filled out on the Child Task page from the Parent Task, to save you having to re-enter it all. Click the Application Submitted button towards the bottom of the page once the fields are filled out. This will move the child task status on to Awaiting Preliminary Offer.
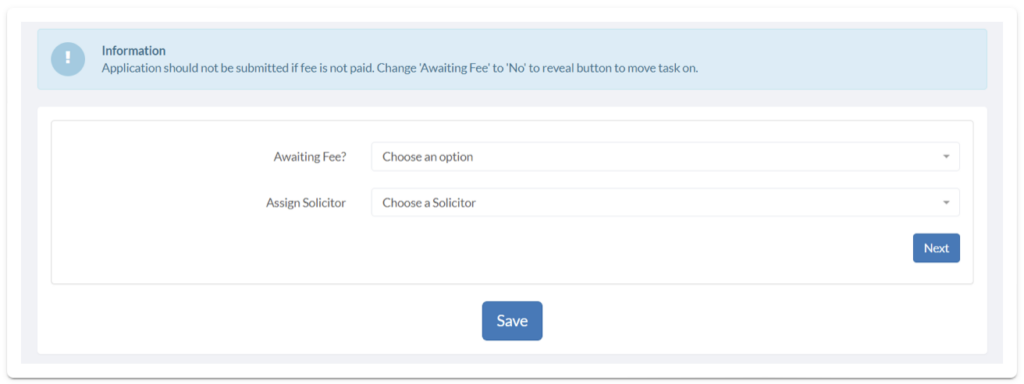
If the new offer expiry date has been extended, log this in the fields provided. When the offer has been received, click the Offer Sent to Client button- this will update the child task status to Offer Sent to Client. If a Valuation is required, click the Valuation Required button- this will create another Child Task.
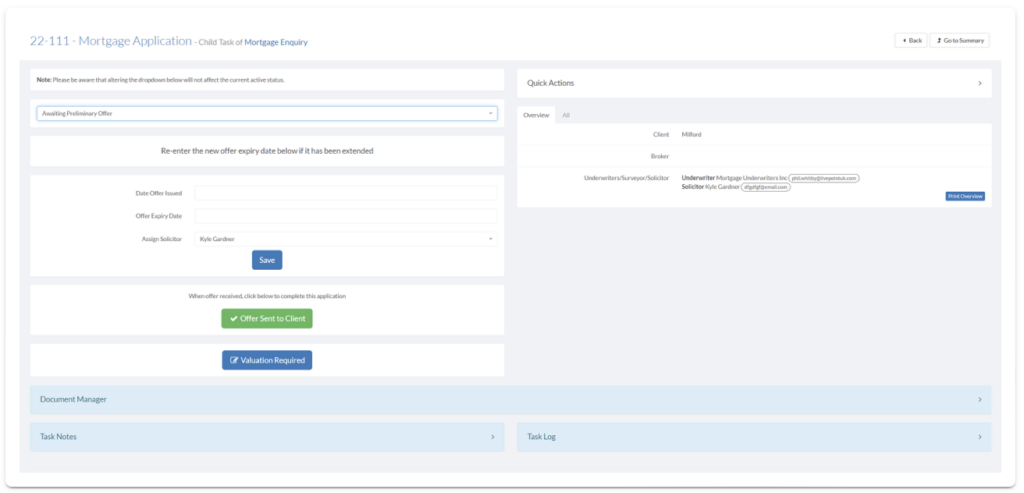
Extend the Offer, Accept the Offer, or Reject the Offer on the Task page. This will move the status onto Offer Accepted or Offer Rejected. If any of the Mortgage Application tasks is successful, this will move the parent Mortgage Enquiry task into the Awaiting Offer Acceptance status.

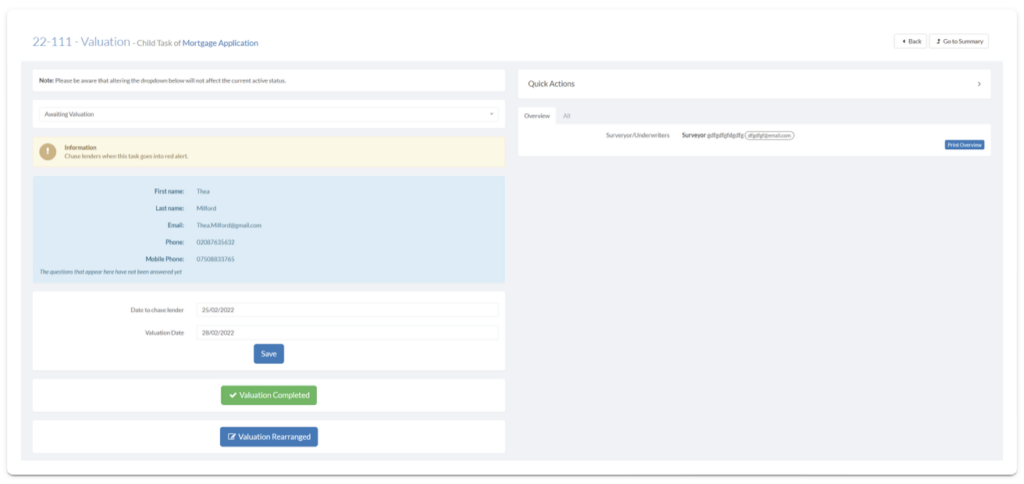
Valuation
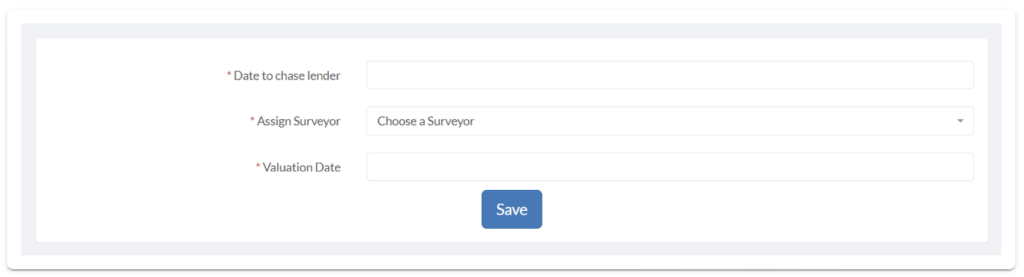
Fill out the fields in the first panel on the Task page. Then click the Save button. This will move the status on to Awaiting Valuation.
Once the Valuation has been carried out, click the Valuation Completed button. This will move the status to Complete and you can return to the Mortgage Application Task. If the Valuation needs to be re-arranged, click the Valuation Rearranged button. This will take you back to the Valuation Details Received status, where you can change the Valuation date.
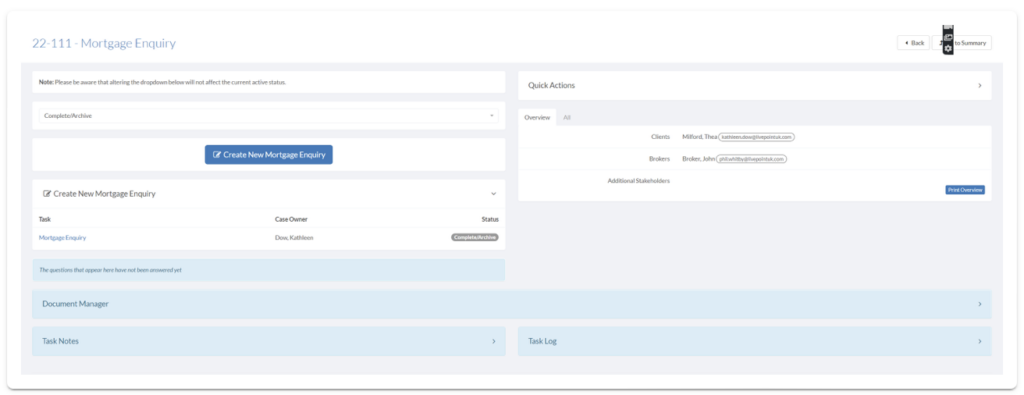
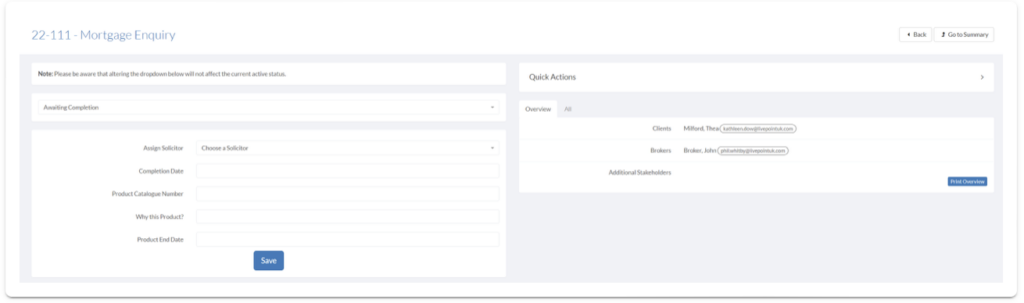
Return to the Parent Mortgage Enquiry Task. The status will now have updated to Awaiting Completion. On the Task page, fill in any required fields in the first panel. If the Mortgage is finalised and finished, click the Mortgage Complete button- this will update the Task status to Complete/Archive. If the Applicant(s) do not wish to proceed with the mortgage, click the Client Not Proceeding button- this will update the Task status to Not Proceeding. If the process needs to be put on hold, fill out the fields in the On-hold Management panel- this will update the Task status to On Hold.
To create a new Mortgage Enquiry for this Applicant(s), click the Create New Mortgage Enquiry button on the Task page. SwiftCase will remember all the Applicant(s) data, so if you do create another Mortgage Enquiry for them, the Task will automatically populate the information fields for you.